Your closet holds hidden treasures waiting to be discovered. Those old shirts gathering dust can become fashion statements with simple cutting techniques. This guide reveals creative sewing easy diy shirt cutting ideas that anyone can master.
This Website contains affiliate links. That means I may earn a small commission if you purchase through my links, at no extra cost to you.
No advanced skills needed here. Each project takes under thirty minutes. You will learn how fabric responds to different cuts and shapes.
The best part is watching plain tees transform into custom pieces. Simple tools create remarkable results. Let’s explore techniques that breathe new life into your wardrobe.
Essential Tools and Materials for DIY Shirt Cutting
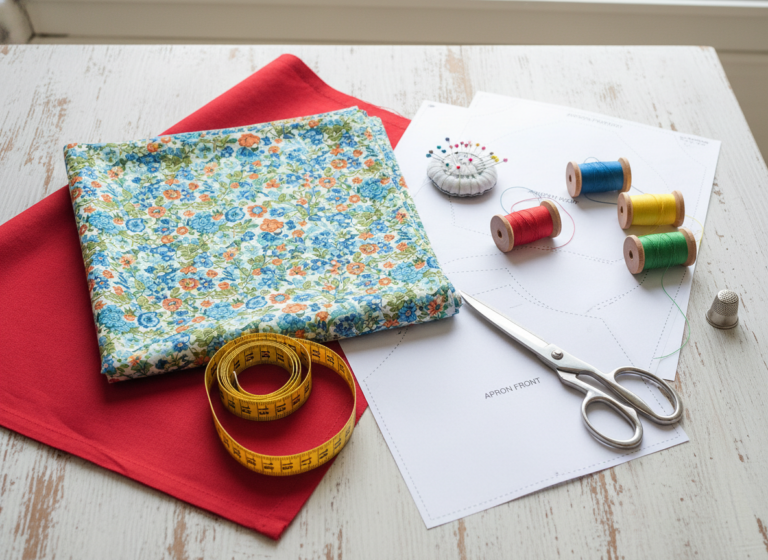
Success starts with the right supplies. Quality tools make cutting easier and results cleaner. Your workspace needs just a few key items to begin any shirt cutting project.
Basic Cutting Tools You Need
Sharp fabric scissors are essential. Dull blades create jagged edges and frustrate your work. Invest in quality shears that cut through fabric smoothly.
Fabric chalk marks your cutting lines. It washes out easily and shows clearly on most fabrics. A clear ruler helps measure evenly across your shirt.
Pins hold fabric in place while you cut. They prevent shifting that ruins symmetry. A cutting mat protects your work surface from blade damage.
Choosing the Right Shirts
Cotton tees work best for beginners. The fabric forgives small mistakes and holds its shape well. Start with shirts you already own before buying new ones.
Check fabric thickness before cutting. Thin material shows skin and may need layering. Medium-weight cotton offers the most versatility for different cutting ideas.
Wash shirts before cutting them. This prevents unexpected shrinking after your project is complete. Let fabric air dry to maintain its natural texture.
Ready to master professional techniques? Discover expert cutting methods and advanced patterns that take your DIY projects beyond basic tutorials. Learn advanced shirt transformation techniques opens new window that professionals use to create stunning custom designs.
Basic Cutting Techniques for Beginners
Mastering fundamental cuts builds confidence for complex projects. These techniques form the foundation of all shirt cutting ideas. Practice on old shirts first to develop your skills.
Neckline Transformations
The neckline sets your shirt’s entire look. A simple cut changes the whole vibe. Mark your desired shape with chalk before making any cuts.
Wide necklines create casual, relaxed styles. Scoop necks offer feminine appeal. V-necks elongate your neck and add elegance to basic tees.
Cut slowly and check frequently. Fabric doesn’t grow back once removed. Small adjustments work better than large, risky cuts.
Sleeve Modifications
Sleeves determine comfort and style. Cut sleeves create different looks for every season. The armhole size affects how the shirt drapes on your shoulder.
Cap sleeves work perfectly for summer weather. Cut straight across just below the shoulder seam. This simple diy technique creates instant tank top vibes.
Removing sleeves entirely forms classic tank tops. Cut along the seam line for clean edges. Leave extra fabric if you plan to add finishing touches later.
Hemline Adjustments
Bottom hems define your shirt’s length and shape. Straight cuts create classic crop tops. Curved hems add flowing movement to your design.
High-low hems trend in casual fashion. Cut the back longer than the front for this effect. This cutting idea works beautifully with loose-fitting tees.
Fringe edges add texture without sewing. Cut small vertical strips along the bottom hem. The fabric naturally curls to create dimension and interest.
Creative Crop Top Designs Anyone Can Make
Crop tops dominate summer fashion every year. These easy diy shirt cutting ideas transform full-length tees into trendy pieces. Each style flatters different body types and personal preferences.
Classic Straight Crop Top
This timeless look never goes out of style. Measure from your shoulder to where you want the hem to end. Add one inch for a rolled edge effect.
Mark a straight line across the shirt at your measurement. Cut slowly while keeping the fabric flat on your surface. The raw edge creates a casual, lived-in appearance.
Try this cut first on an old tee. It builds confidence for more complex cutting ideas. Pair with high-waisted jeans or skirts for balanced proportions.
Twisted Front Crop Design
This project adds visual interest without extra work. Cut your shirt to crop top length first. Then create a small slit at the center front hem.
Twist the fabric through the slit to form a knot. This technique gathers excess fabric and creates shape. The twisted piece stays secure without any sewing required.
Adjust the twist position to change the look. Higher placement creates more gathering at the waist. Lower twists offer subtle shaping with less dramatic effect.
Asymmetrical Hem Crop Top
Asymmetry brings modern edge to basic shirts. This cutting idea works especially well with graphic tees. The uneven hem draws attention upward toward the design.
Mark your shortest point on one side. Gradually angle the line longer toward the opposite side. The difference should be three to four inches for balanced proportion.
Cut along your marked line in one smooth motion. The diagonal creates movement when you walk. This style pairs perfectly with fitted bottoms to balance the flowing hem.
Master Professional Cutting Techniques
Take your shirt transformations beyond basic cuts. Learn expert methods for creating designer-quality pieces that turn heads everywhere you go. Discover techniques professionals use to achieve flawless results every time.
Tank tops offer versatility for layering and standalone wear. These diy shirt cutting ideas create different tank styles from one basic tee. Each variation suits specific occasions and personal style preferences.
Classic Racerback Tank
Racerback tanks provide freedom of movement and athletic style. This cut shows off your shoulder blades beautifully. The design works perfectly for workout wear or casual summer outfits.
Mark a point between your shoulder blades on the back. Draw curved lines from each armhole to this center point. Cut away the excess fabric to reveal the racerback shape.
The straps should be thick enough for support. Thin straps may stretch or tear over time. Leave at least two inches of fabric width for comfortable wear.
Wide Strap Tank Top
Generous straps offer coverage while maintaining cool comfort. This tank style flatters most body types gracefully. The wider cut creates a relaxed, effortless look perfect for everyday wear.
Cut straight down from the shoulder seam toward the armpit. Keep your line four to five inches from the neckline. This measurement ensures adequate coverage without looking boxy.
Remove the entire sleeve in one piece. The raw edges add casual texture to your finished tank. Roll the edges slightly if you prefer a more polished appearance.
Muscle Tank with Deep Armholes
Deep armholes define the muscle tank aesthetic. This cutting idea creates an edgy, laid-back vibe. The style works especially well for beach cover-ups and festival wear.
Extend your armhole cut past the natural seam. Stop several inches below your armpit for the signature look. The side opening adds ventilation and creates distinctive silhouette lines.
Consider wearing a bandeau or sports bra underneath. The deep cut exposes more skin than traditional tanks. Layer wisely to maintain comfort and your preferred coverage level.
Decorative Back Designs That Make Statements
The shirt back offers creative canvas space for unique designs. These cutting ideas transform plain backs into conversation starters. Each pattern adds personality while remaining simple to execute.
Bow Back Shirt Design
Bow backs combine sweet and edgy aesthetics perfectly. This project requires patience but delivers stunning results. The finished piece looks store-bought and professionally designed.
Cut a rectangular section from the upper back. Leave fabric strips on each side to form bow ties. The strips should be equal width and length for symmetrical bows.
Tie the strips into bows at desired intervals. Three to four bows create nice vertical rhythm. This cutting idea works beautifully with solid color shirts that showcase the back detail.
Braided Back Design
Braiding adds intricate detail without complex sewing skills. This technique uses strategic cuts to create woven effects. The pattern works best on medium to large sized tees with ample back fabric.
Cut three parallel vertical strips down the center back. Leave the top and bottom intact to anchor the braid. Weave the strips together as you would braid hair.
Secure the bottom with a small knot or stitch. The braided effect creates texture and visual interest. This diy approach transforms basic shirts into festival-ready fashion pieces.
Heart Cutout Back
Heart shapes add romantic flair to casual tees. This simple cut creates impressive visual impact with minimal effort. The design peeks through to reveal a hint of skin or a contrasting layer underneath.
Draw a heart shape on the upper back between shoulder blades. Keep the heart proportional to your shirt size. Too large overwhelms the design while too small gets lost.
Cut carefully along your marked lines. Save the heart piece as a pattern for future projects. Consider wearing a colored cami underneath to make the cutout pop with contrast.
Unlock Expert Design Techniques
Move beyond basic cutouts and master professional design skills. Learn how to create complex patterns and achieve perfect symmetry in every project you make.
Shoulder and neckline modifications dramatically change shirt appearance. These areas frame your face and set the overall tone. Small adjustments create entirely new styles from the same base shirt.
Off-Shoulder Neckline
Off-shoulder styles exude effortless elegance and femininity. This cut exposes collarbones and shoulders beautifully. The look transitions easily from day to evening wear with simple accessory changes.
Mark a line across the front chest area. The line should sit just below your collarbones. Cut along this mark and around to the back, removing the entire neckline and upper shoulder area.
The shirt naturally drapes off your shoulders when worn. Elastic can be sewn into the top edge if you need more security. This prevents slipping while maintaining the desired aesthetic effect.
One Shoulder Asymmetrical Top
One shoulder designs bring drama to simple tees. This cutting idea creates instant sophistication and visual interest. The asymmetry draws the eye and flatters most body shapes when executed properly.
Remove one entire sleeve and shoulder area completely. Leave the opposite shoulder intact with its original sleeve or cap sleeve. The contrast between covered and exposed creates the signature look.
Balance the design by adjusting the neckline. A slight scoop on the bare shoulder side enhances the asymmetrical effect. This approach works beautifully for evening events and special occasions.
Boat Neck Modification
Boat necklines create graceful horizontal lines across your upper body. This classic cut elongates the neck and emphasizes shoulders elegantly. The wide opening works especially well with statement necklaces and scarves.
Mark a straight line from shoulder seam to shoulder seam. Keep the line high enough to maintain modesty and comfort. Cut straight across, removing the original neckline completely.
The raw edge adds casual charm to this sophisticated cut. You can hem the edge if you prefer polished finish. Either approach delivers timeless style that never goes out of fashion.
Finishing Techniques for Professional Results
Finishing touches separate amateur projects from professional-looking pieces. These techniques polish your cutting ideas into wearable art. Each method adds durability and refined appearance to your custom shirts.
Edge Rolling Method
Rolling edges prevents fraying while creating clean lines. This no-sew technique works perfectly for cotton tees. The rolled edge adds subtle dimension and professional polish to any cut.
Wet the cut edge slightly with water. Roll the fabric edge between your fingers firmly. The moisture helps the fabric hold its rolled shape as it dries.
Continue rolling along the entire cut edge. Press with your fingers to set the roll. The fabric maintains this shape through multiple washes when using quality cotton material.
Distressing for Vintage Effect
Distressed edges add lived-in character to new cuts. This technique works especially well with cutting ideas that embrace casual aesthetics. The intentional wear creates depth and visual texture.
Use sandpaper or a pumice stone on cut edges. Rub gently to fray the fabric slightly. This controlled distressing looks intentional rather than accidental or careless.
Wash your shirt after distressing to enhance the effect. The washing machine naturally continues the fraying process. Each wash adds more vintage character to your custom piece.
Simple Knotting Techniques
Knots gather fabric and create shape without sewing. This approach works perfectly when you want adjustable styling options. Strategic knots transform loose tees into fitted fashion statements instantly.
Side knots cinch waistlines and add feminine flair. Front knots create crop top effects from longer shirts. Back knots showcase decorative cutting ideas while maintaining comfortable fit.
Experiment with knot placement before cutting. The position affects your shirt’s final drape and silhouette. Different knot sizes create varying levels of gathering and shape definition.
Perfect your finishing skills: Professional results come from mastering detail work and proper finishing methods. Learn expert finishing techniques opens new window that give your DIY projects a polished, store-bought appearance every single time.
Styling and Wearing Your Custom Creations
Creating custom shirts is just the beginning of your fashion journey. Styling these pieces properly maximizes their impact and versatility. Strategic pairing enhances your cutting ideas and creates cohesive outfits for any occasion.
Pairing with Bottoms
High-waisted bottoms balance crop tops perfectly. The higher waistline meets the shorter hemline at flattering proportions. This combination elongates legs while maintaining comfortable coverage.
Fitted bottoms complement loose, flowing shirt cuts beautifully. Balance is key in creating harmonious silhouettes. Wide-leg pants pair well with fitted crop tops for modern, sophisticated looks.
Skirts add feminine flair to edgy shirt cutting ideas. A-line skirts balance asymmetrical tops nicely. Pencil skirts create sleek lines when paired with simple tank top variations.
Layering Strategies
Layering extends your custom shirt’s seasonal versatility significantly. Tank tops work perfectly under cardigans and jackets. The cutout details peek through outer layers for added visual interest.
Wear bandeau tops under deep armhole cuts for modesty. Contrasting colors create intentional fashion statements. Matching tones offer seamless, sophisticated looks appropriate for any setting.
Long sleeves underneath short sleeve cuts add dimension and warmth. This approach works especially well during transitional weather seasons. The layered effect creates depth while maintaining comfort throughout temperature changes.
Accessorizing Your Look
Statement necklaces draw attention to creative neckline cuts beautifully. Bold pieces fill empty space created by wide or deep necklines. Keep necklaces proportional to avoid overwhelming your custom design details.
Belts define waistlines on longer shirts and loose fits. Cinching creates shape and highlights your silhouette intentionally. Try different belt widths to change the overall look and proportion.
Scarves add color and texture to simple cutting ideas. Drape lightweight scarves through cutouts for unique effects. This approach transforms the same shirt into multiple different looks effortlessly.
Care and Maintenance for Longevity
Proper care extends the life of your custom cut shirts significantly. These pieces require slightly different handling than standard tees. Following simple maintenance guidelines preserves your hard work and creative cutting ideas for years.
Washing Best Practices
Turn shirts inside out before washing to protect cut edges. This simple step prevents excessive fraying and maintains clean lines. Use cold water to preserve fabric integrity and prevent shrinking.
Gentle cycle settings treat delicate cuts with appropriate care. Harsh agitation damages raw edges and distressed areas unnecessarily. Consider hand washing particularly intricate designs with multiple cutouts or thin straps.
Skip the dryer when possible for best results. Air drying prevents shrinkage and maintains original shirt shape. Lay flat or hang immediately after washing to prevent unwanted creasing and distortion.
Storage Solutions
Fold shirts carefully to avoid creasing decorative back designs. Place tissue paper between layers if storing long term. This prevents colors from transferring and maintains crisp cutting lines beautifully.
Hang pieces with delicate straps to prevent stretching damage. Padded hangers distribute weight evenly across shoulder areas. This approach maintains strap integrity and prevents distortion over extended storage periods.
Separate light and dark colored shirts in storage. This prevents color bleeding even in dry conditions. Organize by style or season for easy access when planning your daily outfits and looks.
Repair and Touch-Ups
Address small tears immediately before they become larger problems. A few quick stitches secure raw edges that begin unraveling. This preventive maintenance saves shirts from complete failure or permanent damage.
Re-distress edges that lose their texture over time. The original distressing technique refreshes the vintage look easily. This touch-up maintains consistency across all your custom pieces and designs.
Refresh rolled edges after multiple washes when needed. Slightly dampen and re-roll sections that have loosened. This quick fix restores the polished appearance without starting completely over on any project.
Complete Your DIY Shirt Transformation Journey
You have learned essential cutting techniques and styling strategies. Now take the next step toward creating professional-quality custom pieces that showcase your unique style. Master advanced methods that elevate every project you create.
Your journey into sewing easy diy shirt cutting ideas opens endless creative possibilities. Each technique you have learned builds upon the last, expanding your skills naturally. Simple tools and basic shirts become your canvas for personal expression and style.
Start with easy projects to build confidence and technique. Practice makes your cuts cleaner and designs more polished over time. Those shirts hiding in your closet now represent opportunities rather than clutter.
Remember that every fashion designer started with basic skills and simple projects. Your unique vision combined with these cutting ideas creates one-of-a-kind pieces nobody else owns. Transform your wardrobe one cut at a time and embrace the creative process fully.