Creating your own handmade tops transforms your wardrobe while building valuable sewing skills. Whether you’re just starting with a sewing machine or looking to expand your DIY clothing collection, making your own tops offers endless creative possibilities.
This Website contains affiliate links. That means I may earn a small commission if you purchase through my links, at no extra cost to you.
This comprehensive guide walks you through everything needed for sewing easy diy top projects. You’ll discover beginner-friendly techniques that deliver professional results without overwhelming complexity.
The journey from selecting your first piece of fabric to wearing your custom-created top becomes achievable with the right guidance. Many sewers discover that structured learning accelerates their progress significantly compared to piecing together random tutorials.
Understanding Basic Top Construction
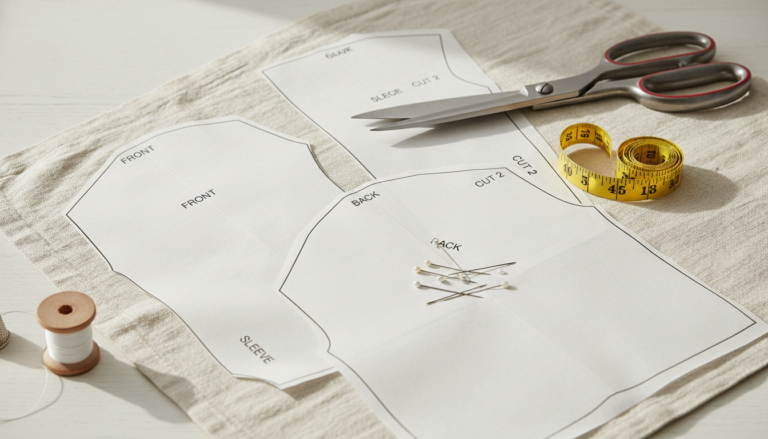
Every top consists of fundamental pieces that come together through specific sewing techniques. The pattern typically includes a front piece, back piece, and optional sleeves depending on your chosen design.
Understanding how these pieces connect helps you visualize the construction process. The side seams join the front and back, while the shoulder seams create the top part of your garment.
Neck and armhole edges require finishing to prevent fraying. This is where techniques like bias binding become essential for creating professional-looking everyday tops.
Essential Pattern Components
Every sewing pattern contains key elements that guide your construction process and ensure proper fit.
Front and back body pieces with marked seam allowances
Sleeve pieces if your design includes them
Neckline and armhole curve guidelines
Grainline arrows showing fabric direction
Basic Construction Steps
Following a logical sequence makes the sewing process smoother and prevents common beginner mistakes.
Cut fabric pieces according to pattern layout
Sew shoulder seams connecting front to back
Attach sleeves if your pattern includes them
Join side seams from armpit to hem
Finishing Techniques
Proper edge finishing transforms homemade items into professional-looking garments worth wearing with pride.
Bias binding for neckline and armholes
Hemming the bottom edge neatly
Securing all seam edges to prevent fraying
Pressing seams for crisp, clean lines
Quality Checkpoints
Reviewing your work at specific stages ensures you catch and correct issues before they become permanent.
Check seam alignment before final stitching
Test fit after major seams are sewn
Verify neckline and armhole comfort
Inspect all hems for consistent length
Ready to Master Professional Sewing Techniques?
Discover comprehensive video tutorials that guide you through every step of creating beautiful, custom-fitted tops. Join thousands of beginners who’ve transformed their sewing skills with expert instruction.
Fabric selection dramatically impacts both the sewing process and the final result. Beginners should start with forgiving materials that handle easily while learning basic techniques.
Cotton fabrics offer excellent beginner-friendly characteristics. They don’t shift or stretch excessively during cutting and sewing, making them ideal for your first projects.
Knit fabrics with some stretch create comfortable everyday tops but require slightly different handling. Understanding fabric characteristics helps you choose the right material for each sewing pattern.
Best Fabrics for Beginner Top Projects
Cotton quilting fabric provides stability and comes in endless color options. The medium weight works well for structured tops that hold their shape throughout the day.
Jersey knit offers comfort and forgiveness for fit issues. The natural stretch accommodates movement while requiring a ballpoint needle on your sewing machine.
Lightweight linen creates beautiful summer tops with a relaxed drape. Though it wrinkles easily, linen becomes softer and more comfortable with each wash.
Fabric Preparation Steps
Prewashing your fabric prevents unwelcome surprises after completing your top. Most cotton and natural fiber fabrics shrink slightly during the first wash cycle.
Press your fabric smooth before cutting pattern pieces. Wrinkles and folds can distort measurements and create uneven pieces that don’t align properly during construction.
Check the fabric grain by pulling gently on the edges. The lengthwise grain runs parallel to the selvage edge and has minimal stretch compared to the crosswise grain.
Setting up your sewing space with the right tools makes every project more enjoyable. You don’t need expensive equipment to create beautiful tops, but certain essentials improve your results significantly.
A reliable sewing machine forms the foundation of your toolkit. Even basic machines handle most top construction tasks when properly maintained and threaded correctly.
Quality scissors or a rotary cutter ensure clean, accurate cuts through your fabric. Dull blades create jagged edges that make precise sewing difficult.
Must-Have Sewing Tools
Sewing machine with straight and zigzag stitch capabilities
Fabric scissors reserved exclusively for cutting fabric
Measuring tape for taking body measurements accurately
Pins or fabric clips to hold pieces together during sewing
Seam ripper for correcting inevitable mistakes
Iron and ironing board for pressing seams and hems
Thread in colors matching your fabric choices
Hand sewing needles for finishing touches
Helpful Additional Supplies
Rotary cutter and self-healing mat for precise cutting
Pattern weights to hold patterns without pinning
Fabric marking pens or chalk for transferring markings
Bias tape maker for creating custom binding
Point turner for sharp corners on collars
Needle threader to save time and frustration
Extra machine needles in various sizes
Small scissors for thread trimming
Investing in quality tools that you enjoy using encourages regular sewing practice. Many sewers find that taking a comprehensive course helps them learn proper tool usage from the start, preventing bad habits and wasted materials.
Step-by-Step Basic Top Tutorial
This tutorial guides you through creating a simple everyday top perfect for beginners. The pattern uses basic rectangles with minimal shaping, making it achievable even for your first garment project.
Taking Your Measurements
Accurate measurements ensure your finished top fits comfortably. Measure your bust at the fullest point, wrapping the tape around your back and across your chest.
Record your shoulder width from shoulder point to shoulder point. This measurement determines the top part width and affects how the sleeves or armholes position on your body.
Measure the desired length from your shoulder down to where you want the hem to fall. Add extra length for seam allowances and hem finishing.
Measure bust circumference at fullest point
Add 4 inches to bust measurement for comfortable ease
Divide total by 4 to get width for front and back pieces
Measure from shoulder to desired hem length
Add 1 inch for seam allowances at top and bottom
Draw rectangular pattern pieces using these measurements
Mark neck opening at top center of front piece
Mark armhole curves on both front and back pieces
Cutting Your Fabric Pieces
Fold your fabric in half lengthwise with right sides together. This way you can cut both front and back pieces simultaneously, ensuring they match perfectly.
Pin your pattern pieces to the fabric, aligning grainlines with the fabric grain. Cut carefully around all edges, maintaining smooth, continuous cuts.
Transfer any pattern markings to your fabric using fabric chalk or marking pens. These guides help you align pieces correctly during sewing.
Sewing the Shoulder Seams
Place front and back pieces with right sides facing together. Pin along the shoulder edges, matching any notches or markings from your pattern.
Sew along the shoulder line using a straight stitch on your machine. A standard seam allowance of half an inch works well for most garments.
Press the shoulder seams open with your iron. This step creates flat, professional-looking seams that don’t create bulk inside your garment.
Master Every Sewing Technique with Confidence
Stop struggling with confusing instructions. Get instant access to clear, professional video tutorials that show you exactly how to create beautiful tops every time. Perfect for beginners ready to advance their skills.
Bias binding creates a clean, professional edge around your neckline. You can purchase premade bias tape or create your own from coordinating fabric.
Open one folded edge of the bias binding. Pin the raw edge along the neck edge with right sides together, starting at one shoulder seam.
Sew the binding in place following the fold line. When you reach your starting point, overlap the binding ends slightly and trim excess.
Fold the binding over the raw edge to the inside. Pin from the right side, ensuring the binding covers your previous stitching line on the wrong side.
Topstitch from the right side, catching the binding edge underneath. This creates a neat finish visible from the outside while securing all layers.
Completing the Armholes
The armhole neckline edges receive the same bias binding treatment as the neck. This consistent finishing technique creates a cohesive, polished appearance throughout your garment.
Measure around each armhole opening to determine how much binding you need. Cut bias binding strips with a few extra inches for overlap and handling.
Apply the binding using the same method as the neckline. Take your time at the curved bottom of the armhole where the fabric curves most dramatically.
Sewing the Side Seams
With neckline and armholes finished, you’re ready to join the sides. Fold your top with right sides together, matching the bottom edges and armhole seams.
Pin along both side edges from armpit to bottom hem. Check that your front and back pieces align properly before sewing.
Sew each side seam in one continuous line. Backstitch at the beginning and end to secure your stitching and prevent unraveling.
Press the side seams toward the back of the garment. This creates a smooth silhouette and prevents seam bulk from showing through on the front.
Hemming the Bottom Edge
A clean hem completes your top and ensures the bottom edge wears well through multiple washings. The hem finish you choose affects both appearance and durability.
Try on your top before finalizing the hem length. Mark the desired length with pins while wearing the garment to ensure it falls exactly where you want.
Fold the bottom edge up by half an inch and press. Fold again by another half inch, creating a double-fold hem that encloses the raw edge completely.
Sew close to the inner folded edge, maintaining an even distance from the edge. This creates neat, parallel stitching that looks professional and lasts through many wearings.
Adding sleeves transforms a basic top into a more versatile garment suitable for different seasons and occasions. Sleeve construction seems intimidating at first but becomes manageable with proper technique.
Short sleeves offer a comfortable option for warm weather tops. The sleeve piece typically appears as a curved rectangle that attaches to the armhole opening.
Cap sleeves provide minimal coverage while adding feminine detail. These small sleeve pieces require careful easing around the curve to prevent puckering.
Preparing the Sleeve Piece
Hem the bottom edge of each sleeve before attaching it to the body. This approach makes hemming much easier than trying to work in the tight space after sleeve attachment.
Mark the center top of your sleeve piece and the shoulder seam of your top. Matching these points ensures your sleeve centers properly on your shoulder.
Some patterns include notches or markings on both sleeve and armhole. These guides help you distribute the fabric evenly as you pin the pieces together.
Attaching Sleeves to the Body
Pin the sleeve to the armhole opening with right sides together. Start at the shoulder seam, matching your center markings, then work toward the underarm on both sides.
The sleeve edge is often slightly longer than the armhole opening. This extra length creates a subtle curve over the shoulder when distributed evenly around the armhole.
Sew slowly around the curve, removing pins as you approach them. Guide the fabric gently without pulling or stretching either piece out of shape.
Finish the sleeve seam by sewing it closed from the bottom of the sleeve to the side seam. This creates one continuous seam along the underarm and down the side of your body.
Professional sewers often recommend comprehensive video tutorials for mastering sleeve techniques, as seeing the process in motion clarifies the steps more effectively than static images or text descriptions alone.
Advanced Finishing Techniques
Moving beyond basic construction opens new creative possibilities for your handmade tops. These techniques add professional touches that elevate your garments from homemade to handcrafted.
Creating French Seams
French seams enclose raw edges completely within the seam itself. This finishing method works beautifully on lightweight fabrics and sheer materials where regular seam allowances might show through.
Begin by sewing your seam with wrong sides together, contrary to the usual method. Trim this seam allowance to about an eighth of an inch.
Press the seam to one side, then fold the fabric so right sides are now together. The narrow seam you just sewed rolls to the edge inside this fold.
Sew a second seam about a quarter inch from the folded edge. This stitching line encases the raw edges from your first seam completely inside, creating a clean finish on both sides of your fabric.
Adding Decorative Topstitching
Topstitching serves both functional and decorative purposes. The visible stitching line secures seams flat while adding design interest to your garment.
Choose thread color carefully for topstitching. Matching thread blends in subtly, while contrasting thread creates bold design lines that draw the eye.
Sew your topstitching lines at an even distance from the seam or edge. Many machines have throat plate markings that help you maintain consistent spacing without constant measuring.
Bias Binding for Professional Edges
While you’ve already used basic bias binding on the neckline and armholes, exploring different binding widths and application methods expands your finishing options.
Wider bias binding creates a visible design element around edges. Narrow binding virtually disappears while still providing clean edge finishing.
Making your own bias binding from fabric matching or contrasting with your top adds custom detail. A bias tape maker simplifies this process significantly.
Cut fabric strips on the true bias by folding your fabric at a 45-degree angle to the selvage. This diagonal cutting creates strips with natural stretch that curve smoothly around necklines and armholes.
Transform Your Sewing Skills with Expert Guidance
Why struggle through trial and error when you can learn proven techniques from experienced instructors? Access hundreds of detailed video lessons covering every aspect of garment construction, from basic tops to advanced techniques. Join a supportive community of sewers achieving beautiful results.
Every sewer encounters challenges during projects. Understanding how to identify and fix common problems saves frustration and prevents you from abandoning partially finished tops.
Fixing Puckered Seams
Puckering occurs when fabric gathers slightly along a seam line instead of lying smooth and flat. This issue often results from tension problems or pulling fabric while sewing.
Check your machine tension settings first. The top and bobbin threads should lock in the middle of your fabric layers, not pulling to one side.
Avoid pulling or pushing fabric as it feeds through the machine. Let the feed dogs move the fabric naturally at their own pace.
If seams still pucker, try a slightly longer stitch length. Very short stitches can cause fabric to gather, especially on lightweight materials.
Correcting Uneven Hems
Hems that wave or dip instead of hanging straight indicate uneven folding or stretching during sewing. Prevention works better than correction for hem issues.
Measure your hem fold at multiple points around the garment. Use pins to mark the fold line evenly all the way around before pressing.
Press the hem carefully without stretching the fabric. Steam can help set the fold without requiring heavy iron pressure that distorts fabric edges.
When sewing the hem, maintain consistent seam allowance distance. Don’t pull the fabric toward you or let it drag behind the machine.
Managing Bias Binding Problems
Bias binding challenges include wavy edges, twisted binding, or visible raw edges showing through. Each issue has specific causes and solutions.
Wavy edges result from stretching the binding as you pin or sew it. Handle bias binding gently, allowing its natural stretch to ease around curves without pulling.
Twisted binding happens when you don’t maintain consistent fold orientation. Check that the binding stays properly folded as you work your way around the edge.
Raw edges showing through indicate insufficient binding width or inconsistent folding. Ensure your binding fully covers the raw edge on both sides before topstitching.
Expanding Your Skills
Once you’ve mastered basic top construction, numerous variations and techniques await exploration. Each new skill you develop expands your creative options and wardrobe possibilities.
Pattern Variations to Try
Changing neckline shapes dramatically alters a top’s appearance. V-necks, boat necks, and scoop necks each create different aesthetics using the same basic construction principles.
Different hem treatments add variety to your makes. Curved hems, high-low hems, and side slits transform basic patterns into unique pieces.
Adding design details like pockets, gathering, or pleats introduces new technical challenges while creating more interesting garments.
Working with Patterns from Different Sources
Commercial sewing patterns provide professionally drafted designs with detailed instructions. Learning to read pattern envelopes and instruction sheets opens access to countless design options.
PDF patterns downloaded and printed at home offer modern designs often focused on beginner-friendly construction. These patterns frequently include photo tutorials and active online communities for support.
Drafting your own patterns based on measurements creates perfectly customized garments. This advanced skill builds on everything you’ve learned about garment construction and fit.
Many sewers find that enrolling in a comprehensive sewing course provides structured progression through these advancing skills, with each lesson building logically on previous knowledge.
Proper care extends the life of your handmade tops significantly. Understanding fabric characteristics helps you choose appropriate washing and storage methods.
Washing Your Handmade Tops
Natural fiber fabrics like cotton and linen typically tolerate regular machine washing. Turn garments inside out to protect any decorative stitching or applied details.
Knit fabrics maintain their shape better with gentle cycle settings. High agitation can stretch or distort knit garments over time.
Hand washing delicate fabrics or garments with special embellishments preserves their beauty longer. Use cool water and gentle detergent designed for delicate fabrics.
Pressing and Storage
Iron your tops while slightly damp for easiest wrinkle removal. Cotton and linen fabrics accept high heat, while synthetics require lower temperature settings.
Store tops on hangers or folded neatly in drawers. Hanging works better for structured tops that might develop permanent creases from folding.
Protect garments from direct sunlight during long-term storage. Prolonged sun exposure fades colors and weakens fabric fibers over time.
Building Confidence and Community
Growing as a sewer involves more than technical skill development. Connecting with other makers and celebrating your progress builds lasting enthusiasm for the craft.
Documenting Your Progress
Photograph each completed project to track your skill development over time. You’ll be amazed how quickly your techniques improve with consistent practice.
Keep a sewing journal noting what worked well and what you’d change on each project. These notes become valuable references for future makes.
Share your creations with supportive online communities. Fellow sewers offer encouragement, answer questions, and provide inspiration for your next project.
Setting Achievable Goals
Start with simple projects that build confidence through successful completion. Each finished top represents new skills mastered and experience gained.
Gradually increase difficulty as your comfort level grows. Challenge yourself periodically while maintaining enough easy projects to stay motivated.
Consider working through a structured course that provides clear progression from beginner to advanced techniques. This approach ensures you develop foundational skills thoroughly before tackling complex projects.
Join Thousands Creating Beautiful, Custom Tops
Stop feeling frustrated by confusing tutorials and wasted fabric. Get lifetime access to professional video instruction, downloadable patterns, and a supportive community of fellow sewers. Start creating tops you’ll actually want to wear with confidence-building lessons designed specifically for beginners. Everything you need to master sewing easy DIY tops is waiting for you.
Creating your own tops through sewing easy diy top techniques opens up a world of creative expression and practical skill. From selecting the perfect piece of fabric to applying the final binding around your neckline, each step builds your confidence and capabilities.
The journey from beginner to accomplished sewer happens one project at a time. Every top you complete teaches valuable lessons about fabric behavior, machine operation, and garment construction.
Remember that professional results come from practice and patience. Your first attempt might not look perfect, but each subsequent project will show visible improvement as your skills develop.
Whether you’re creating simple everyday tops for casual wear or more elaborate designs for special occasions, the fundamental techniques remain consistent. Master these basics thoroughly, and you’ll be prepared to tackle any top pattern with confidence.
The satisfaction of wearing something you created yourself, perfectly fitted to your measurements and preferences, makes every moment spent learning worthwhile. Start your sewing journey today and discover the joy of handcrafted, custom clothing.