There’s something magical about beach-inspired nail art that instantly transports you to sandy shores and ocean breezes. Whether you’re planning a tropical getaway or simply dreaming of one, the right beach nail inspo can bring those vacation vibes to your fingertips year-round. From subtle sandy textures to vibrant sunset gradients, we’ve curated the ultimate collection of beach nail designs that will have your Instagram and Pinterest followers double-tapping with envy.
This Website contains affiliate links. That means I may earn a small commission if you purchase through my links, at no extra cost to you.
In this comprehensive guide, we’ll explore everything from beginner-friendly ocean waves to intricate seashell accents that look like treasures washed ashore. Get ready to dive into a sea of inspiration that will transform your next manicure into a beach-day masterpiece!
Mesmerizing Ocean Wave Nail Designs
Nothing captures the essence of the beach quite like the gentle rhythm of ocean waves. These fluid, water-inspired designs bring the tranquility of the sea right to your fingertips.
Gradient blue waves create a stunning ocean effect that’s perfect for summer
Ombre Ocean Blues
Ombre nails are the perfect canvas for recreating the varying depths of ocean waters. Start with a pale sky blue at the cuticle that gradually deepens into a rich navy at the tips. This gradient effect mimics the way the ocean transitions from shallow to deep waters.
Create this look with a makeup sponge and layered blue polishes
To achieve this look at home, you’ll need a few shades of blue polish and a makeup sponge. Apply a white base coat first to make your blues pop, then use the sponge to dab on layers of different blue shades, starting with the darkest at the tip. Seal with a glossy top coat for that wet-look finish that resembles glistening water.
Essential Tools for Ocean Wave Nails
Create stunning ocean-inspired designs with the right supplies. Quality blue polishes, makeup sponges, and a good top coat are must-haves for achieving that perfect wave effect.
For a more defined wave look, try creating actual wave patterns on your nails. This design mimics the white caps and curves of ocean waves with striking detail.
White wave details create movement and dimension
To create this design, start with a solid blue base. Once dry, use a thin nail art brush and white polish to draw curved wave lines. Don’t worry about perfection—the natural variations will actually enhance the organic wave effect. For added dimension, dot tiny silver or pearl accents to represent water droplets or sea foam.
Dreamy Sandy Texture Nail Art
Bring the tactile beauty of beach sand to your manicure with these textured designs that capture the warm, grainy feel of sun-kissed shores.
Sandy beige with gold shimmer creates a sun-kissed beach effect
Glittering Sand Effect
Recreate the magic of sunlight dancing on grains of sand with a textured, glittering manicure. This style combines neutral beige tones with gold and silver micro-glitters for that authentic sandy beach look.
Micro-glitters create an authentic sand-like texture
For this look, apply a beige or tan base coat, then while it’s still slightly tacky, sprinkle on fine gold and silver micro-glitters. You can also use a textured polish specifically designed to create a sandy effect. Finish with a matte top coat to enhance the grainy texture, or go with a glossy finish to mimic wet sand at the shoreline.
Create Perfect Sandy Texture Nails
Get that authentic beach sand look with the right textured polishes and fine glitters. These products make it easy to achieve a realistic sandy effect at home.
Combine the best of both worlds with a gradient that transitions from sandy beige at the cuticle to ocean blue at the tips. This design beautifully captures the shoreline where sand meets sea.
This shoreline-inspired gradient perfectly captures where sand meets sea
To create this shoreline effect, apply a beige base and let it dry completely. Then, using a makeup sponge, dab blue polish onto the tips, gradually building up the color intensity. For added realism, you can add a line of white between the sand and sea colors to represent sea foam, and perhaps a touch of glitter on the sandy portion.
Elegant Seashell Accent Nails
Seashells are nature’s perfect beach accessory, and they make for stunning nail art that brings sophisticated coastal charm to your fingertips.
Channel the iridescent beauty of seashells with designs that capture their unique patterns and pearl-like finish. These elegant accents work beautifully on a neutral base for a sophisticated take on beach-inspired nails.
Iridescent polish creates an authentic shell-like finish
For this luxurious look, start with a nude or pale pink base. Use a thin brush and white or cream polish to draw shell outlines, then fill in with an iridescent or chrome polish to capture that mother-of-pearl effect. Add tiny pearl embellishments or rhinestones for extra dimension. The key is to keep the base neutral so your shell designs can really shine.
Perfect Your Seashell Nail Art
Create stunning seashell designs with specialized tools and polishes. From iridescent finishes to fine detail brushes, these products will help you achieve salon-quality results.
Take your beach nail art to the next level with three-dimensional shell accents that add texture and visual interest to your manicure.
3D shell elements create stunning textural contrast
This eye-catching look can be achieved with specialized nail charms or by creating your own 3D elements using builder gel or acrylic. Apply a base color of your choice, then carefully place your shell embellishments while the top coat is still tacky. Seal with another layer of top coat to secure the 3D elements. This style works best as an accent on one or two nails rather than all ten for a balanced look.
Tropical Palm Tree Nail Designs
Nothing says “tropical paradise” quite like the silhouette of palm trees against a sunset sky. These iconic beach symbols make for instantly recognizable and stunning nail art.
Palm silhouettes against a sunset gradient create tropical paradise vibes
Sunset Palm Silhouettes
Capture the magic of a tropical sunset with gradient backgrounds in warm oranges, pinks, and purples, topped with stark black palm tree silhouettes.
Create a stunning sunset backdrop for your palm silhouettes
To create this vacation-worthy look, start by making a sunset gradient using orange, pink, and purple polishes on a sponge. Once dry, use a thin brush and black polish to carefully paint palm tree silhouettes. Keep the trees simple—a straight trunk with a few fronds at the top is all you need for that recognizable tropical shape. For added dimension, you can place the trees at different heights across your nails.
Essential Tools for Palm Tree Nail Art
Create picture-perfect palm tree designs with the right tools. Fine detail brushes and quality black polish are must-haves for those crisp silhouettes.
For a more luxurious take on tropical nail art, try palm designs in metallic gold against a solid color background.
Gold palm details add luxury to beach-inspired nails
This elegant variation works with any background color, but looks particularly striking against deep teals, navy blues, or crisp whites. Apply your base color and let it dry completely. Then, either use gold polish with a fine brush to paint palm designs, or apply gold foil for a more textured effect. You can also find palm tree nail stickers or decals for an easier application.
Breathtaking Sunset Gradient Nails
Beach sunsets provide some of nature’s most spectacular color displays, making them perfect inspiration for vibrant gradient nail art.
Vibrant sunset colors create a stunning ombre effect
Classic Sunset Ombre
Recreate the breathtaking colors of a beach sunset with a gradient that transitions from fiery orange to rich purple, just like the sky as the sun dips below the horizon.
Blend colors seamlessly for an authentic sunset effect
This eye-catching look requires several polish colors to achieve the full sunset effect. Start with a white base coat to make your colors pop. Then, using a makeup sponge, create a gradient with yellow at the cuticle, blending into orange, then pink, and finally purple at the tips. The key is to overlap your colors slightly on the sponge so they blend seamlessly. Seal with a glossy top coat to enhance the vibrant colors.
Create Perfect Sunset Gradient Nails
Achieve stunning sunset effects with the right polish colors and tools. A good makeup sponge and quality polishes in sunset hues are essential for this eye-catching look.
Enhance your sunset gradient with silhouette details that add depth and story to your nail art.
Silhouette details transform sunset nails into mini beach scenes
After creating your sunset gradient base, use black polish and a fine detail brush to add silhouettes that evoke beach scenes—palm trees, seagulls in flight, sailboats on the horizon, or even a couple walking along the shore. These simple black shapes against the vibrant sunset colors create dramatic contrast and turn your nails into miniature works of art.
Classic Nautical Themed Nail Art
Nautical designs bring a timeless, preppy vibe to beach-inspired nail art with their clean lines and maritime motifs.
Traditional nautical colors and motifs create timeless beach style
Navy and White Stripes
Nothing says “nautical” quite like crisp navy and white stripes, a classic design that never goes out of style.
Clean stripes with a pop of red create classic maritime style
For this timeless look, start with a white base coat. Once dry, use striping tape to create clean horizontal lines, then fill in alternate sections with navy blue polish. Remove the tape while the polish is still slightly wet for the cleanest lines. Add a small red anchor or star on an accent nail for that perfect nautical touch. This style works beautifully on all nail shapes and lengths.
Perfect Your Nautical Nail Art
Create crisp, clean nautical designs with the right tools. Striping tape and quality polishes in classic maritime colors are essential for this timeless look.
Incorporate classic maritime symbols like anchors, ship wheels, and compasses for an instantly recognizable nautical theme.
Maritime symbols add authentic nautical character
These detailed designs work best as accents on one or two nails rather than across all ten. Start with a solid base color—navy blue, white, or red are traditional nautical choices. Then, either hand-paint your maritime symbols using a detail brush or apply pre-made nautical nail decals for an easier option. For added dimension, you can outline your symbols in gold or add small rhinestones as accents.
Vibrant Tropical Flower Nail Art
Bring the lush beauty of tropical flora to your fingertips with bright, bold flower designs that capture the essence of exotic beach destinations.
The hibiscus flower is an iconic symbol of tropical beaches, making it a perfect motif for summer-ready nail art.
Create realistic hibiscus flowers with layered polish techniques
To create hibiscus flowers, start with a solid background color—white, teal, or navy blue make great canvases. Using a detail brush and pink or red polish, paint five oval petals radiating from a center point. Add a yellow center and thin white highlights on the petals for dimension. For a more realistic effect, you can add darker shading at the base of each petal. These flowers work beautifully as accent nails or can be scattered across all nails for a more dramatic look.
Create Stunning Tropical Flower Nails
Bring exotic blooms to your fingertips with the right tools and polishes. Detail brushes and vibrant tropical colors are essential for these eye-catching designs.
Expand your tropical flower repertoire with delicate plumeria blooms and lush green leaves for a varied botanical look.
Combine different tropical elements for a lush botanical effect
Plumeria flowers are simpler to create than hibiscus—just five rounded petals in white or pale pink with a yellow center. Pair these delicate blooms with green tropical leaves like monstera or palm fronds for a lush, varied look. This combination works beautifully on a pale pink or nude background for a more subtle tropical vibe, or against bright colors for bold contrast.
Enchanting Mermaid-Inspired Nail Designs
Channel your inner sea goddess with shimmering, scale-like patterns and iridescent finishes that capture the mythical beauty of mermaids.
Shimmering scales create magical mermaid vibes
Iridescent Scale Patterns
Recreate the mesmerizing look of mermaid tails with overlapping scale patterns in shimmering, color-shifting finishes.
Use fishnet or scale stencils for perfect pattern application
This enchanting look is easier to achieve than it appears. Start with a base color in blue, teal, or purple. Once dry, place fishnet material or a specialized scale stencil over your nail and apply a contrasting iridescent or chrome polish over the top. When you remove the stencil, you’ll have a perfect scale pattern. For added dimension, apply a holographic top coat or add tiny pearls as accents.
Create Magical Mermaid Nails
Transform your nails into shimmering mermaid tails with specialized tools and polishes. Scale stencils and iridescent finishes are key to this enchanting look.
Enhance your mermaid-inspired manicure with pearls, tiny shells, and other dimensional elements that evoke undersea treasures.
3D elements add luxurious dimension to mermaid nails
For this luxurious look, start with an iridescent or chrome base color. Once dry, carefully place pearl beads, tiny shell charms, or rhinestones onto your nails using nail glue or embedding them in a still-tacky top coat. Arrange these elements in clusters for a treasure trove effect, or place them strategically as accents. Seal everything with a thick top coat to ensure your embellishments stay secure.
Elegant Minimalist Beach Nail Art
Not all beach-inspired nail art needs to be bold and colorful. These subtle designs capture coastal vibes with clean lines and understated elements.
Simple wave lines create subtle beach elegance
Single Wave Accents
Sometimes less is more. A single, delicate wave line across an otherwise neutral nail creates a sophisticated nod to beach themes.
A single wave line creates subtle beach elegance
This understated look is perfect for those who prefer minimal nail art or need a more professional manicure. Start with a neutral base like nude, beige, or pale pink. Once dry, use a thin brush and blue polish to draw a single curved line across the nail. You can place it horizontally, diagonally, or even create a tiny wave at just the tip of the nail. The simplicity of this design makes it timeless and versatile.
Perfect Your Minimalist Beach Nails
Create elegant, subtle beach-inspired designs with the right tools. Ultra-fine detail brushes and quality neutral polishes are essential for these sophisticated looks.
Incorporate the trendy negative space technique into your beach-inspired manicure for a modern, minimalist look.
Negative space designs create contemporary beach style
This contemporary approach leaves portions of your natural nail visible, creating interesting shapes and patterns. Apply a clear base coat, then use striping tape to section off areas of your nail. Paint the exposed sections with beach-inspired colors like blue or sandy beige, then remove the tape to reveal the negative space. You can create simple geometric shapes, wave patterns, or even abstract representations of beach scenes.
Beach-Inspired French Tip Variations
Give the classic French manicure a coastal makeover with these beach-inspired variations on the timeless tip design.
Wave-inspired tips create a fresh take on the classic French manicure
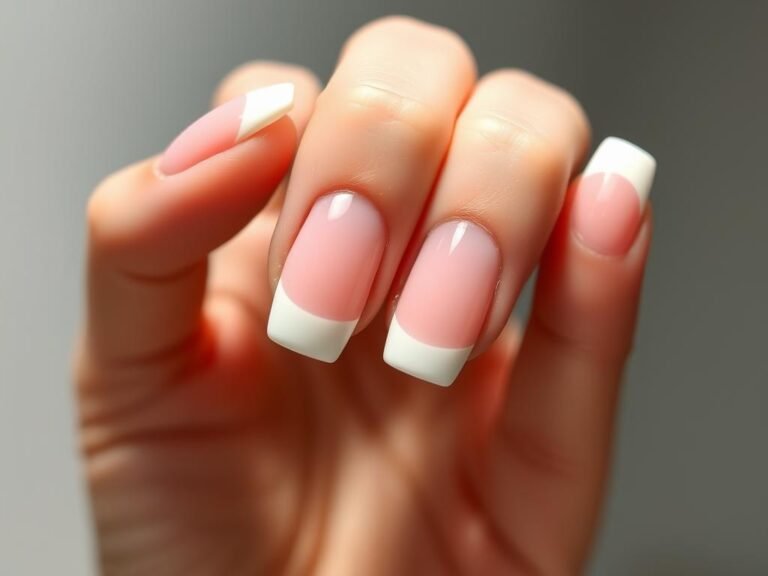
Ocean Blue Tips
Swap the traditional white tips for various shades of blue to create a fresh, ocean-inspired take on the classic French manicure.
Blue tips create an ocean-inspired French manicure
This refreshing variation maintains the elegance of a French manicure while incorporating beach vibes. Start with a sheer pink or nude base, then create tips using blue polish instead of white. You can opt for a solid blue line or get creative with an ombre effect using multiple blue shades. For added interest, try a wavy line instead of the traditional straight edge to mimic ocean waves.
Create Perfect Beach French Tips
Achieve clean, precise French tip variations with the right tools. French tip guides and quality blue polishes will help you create these elegant beach-inspired designs.
Combine the structure of a French tip with delicate seashell accents for an elegant beach-inspired design.
Delicate shell accents elevate traditional French tips
For this sophisticated look, create traditional French tips with white or a pale color, then add tiny seashell designs along the tip line. You can paint these by hand using a detail brush or apply small shell decals. For added luxury, incorporate tiny pearls or iridescent accents. This design maintains the classic elegance of a French manicure while adding just the right amount of beach-inspired detail.
Bring the Beach to Your Fingertips
Whether you’re preparing for an actual beach vacation or simply want to carry a piece of summer with you year-round, these beach nail designs offer endless inspiration for your next manicure. From the subtle elegance of minimalist wave accents to the bold statement of tropical flower art, there’s a beach-inspired look for every style preference and skill level.
Remember that nail art is all about creative expression—don’t be afraid to mix and match elements from different designs or adapt them to suit your personal style. The most important thing is to have fun and let your nails tell a story of sandy shores, ocean breezes, and endless summer days.
Ready to Create Your Beach-Inspired Manicure?
Get all the supplies you need to bring these stunning beach nail designs to life. From specialized tools to the perfect polish colors, Amazon has everything for your DIY nail art adventures.
Which beach nail design will you try first? Whether you’re drawn to the tranquil blues of ocean waves, the vibrant colors of tropical flowers, or the shimmering allure of mermaid scales, your perfect summer manicure awaits. Happy polishing!