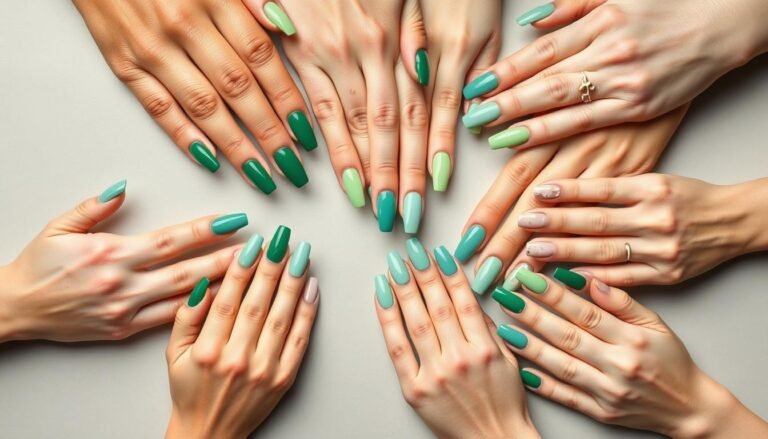
Ombre acrylic nails have taken the beauty world by storm, offering a seamless gradient effect that transitions from one gorgeous color to another. This eye-catching nail art technique creates dimension and depth that flat colors simply can’t match. Whether you’re looking for subtle elegance or bold statement nails, the versatility of ombre acrylics makes them perfect for any occasion, season, or personal style.
This Website contains affiliate links. That means I may earn a small commission if you purchase through my links, at no extra cost to you.
In this comprehensive guide, we’ll explore everything you need to know about creating, maintaining, and rocking the perfect ombre acrylic nails. From professional techniques to DIY approaches, trending color combinations to essential tools – we’ve got you covered with all the inspiration you need for your next manicure masterpiece.
What Are Ombre Acrylic Nails?
Ombre nails feature a beautiful color gradient that blends two or more shades together. When combined with acrylic application, this technique creates a durable, long-lasting manicure with stunning visual impact. Unlike traditional single-color acrylics, ombre designs add dimension and visual interest that can complement any outfit or occasion.
The Science Behind the Blend
The magic of ombre acrylic nails lies in the careful blending of colors while the acrylic is still wet. This technique requires precision and skill to create a seamless transition between shades. The acrylic powder provides the perfect medium for this gradient effect, as it allows colors to be manipulated before setting.
Professional nail technicians often use specialized brushes and techniques to achieve the perfect blend, while DIY enthusiasts can use sponges and gradual application methods to create similar effects at home.
Popular Ombre Acrylic Nail Styles
The versatility of ombre acrylic nails means there are countless ways to wear this trend. From placement to color combinations, here are some of the most sought-after styles that dominate social media and salon requests.
Horizontal Ombre
The classic ombre style features a color transition from the cuticle to the tip. This creates a lengthening effect that’s particularly flattering on shorter nails. Popular combinations include nude to white, pink to white, and darker to lighter shades of the same color family.
Vertical Ombre
This unique approach creates a gradient from one side of the nail to the other. It’s perfect for creating unexpected visual interest and works beautifully when you want to incorporate multiple colors. Try a sunset-inspired blend of orange, pink, and purple for a show-stopping look.
Glitter Ombre
For those who love a touch of sparkle, glitter ombre combines a solid base color with a gradual transition to glitter at the tips. This creates a magical, eye-catching effect that’s perfect for special occasions or when you simply want to add some glamour to your everyday look.
French Ombre (Baby Boomer)
Also known as “baby boomer nails,” this sophisticated style updates the classic French manicure with a soft gradient instead of a harsh line. The result is an elegant, natural-looking effect that transitions from a pink or nude base to white tips.
Rainbow Ombre
For the bold and adventurous, rainbow ombre incorporates multiple colors across the nails. This can be done as a gradient on each individual nail or as a progressive color story across all ten fingers for a truly unique and playful look.
Matte Ombre
Adding a matte top coat to an ombre design creates a sophisticated, velvety finish that’s both modern and elegant. The absence of shine allows the color transition to take center stage, creating a subtle yet impactful look.
Ready to Try These Stunning Styles?
Find all the supplies you need to create gorgeous ombre acrylic nails at home. From acrylic powders to specialized brushes, Amazon has everything for your nail art journey.
Creating ombre acrylic nails at home might seem intimidating, but with the right tools and techniques, you can achieve salon-quality results. Follow this comprehensive guide to master the art of the gradient.
Essential Supplies
Acrylic nail kit (liquid monomer and powder polymers)
Prep your nails: Remove old polish, push back cuticles, and gently buff the nail surface. Apply nail dehydrator followed by primer.
Apply nail tips or forms: If you’re extending your nails, attach tips or forms now.
Create your base: Apply a thin layer of your base color acrylic across the entire nail.
Begin the gradient: Place a small bead of your second color at the area where you want the gradient to begin (typically at the tip or middle of the nail).
Blend the colors: Using the tip of your brush, gently work the second color into the first, creating a seamless transition. The key is to blend while both colors are still wet.
Shape and refine: Once the acrylic has set, file and shape your nails to your desired look.
Buff and shine: Buff the surface until smooth, then apply top coat for a glossy finish (or matte top coat for a velvet effect).
Method 2: Sponge Technique (Beginner-Friendly)
Apply base acrylic: Create a solid base with clear or your lightest color acrylic.
Paint polish gradient: On a piece of foil, place dots of your chosen polish colors side by side.
Sponge application: Dab a small makeup sponge into the polish colors, then gently dab onto the nail to create the gradient effect.
Repeat for intensity: Apply multiple layers of sponged polish for a more defined gradient.
Seal with top coat: Once you’re happy with the gradient, seal with a generous layer of top coat to smooth the texture and add shine.
Pro Tip: For the perfect blend, make sure your acrylic isn’t too wet or too dry. The consistency should be similar to a small bead that holds its shape but is still pliable enough to work with.
– Professional Nail Technician
Trending Ombre Acrylic Nail Color Combinations
The right color combination can make your ombre acrylic nails truly stand out. Here are some of the most popular and eye-catching combinations that are trending this season.
Classic Elegance
Nude to white creates a timeless, sophisticated look that works for any occasion. This subtle gradient is perfect for weddings, professional settings, or when you want an elevated everyday style.
Ocean Dreams
Blue to purple gradients evoke the mysterious depths of the ocean. This combination works beautifully on longer nails where the transition has more space to develop.
Sunset Vibes
Orange blending into pink creates a stunning sunset effect that’s perfect for summer. Add a touch of gold at the tips for extra dimension and warmth.
Midnight Sparkle
Black fading into silver or gunmetal creates an edgy, nighttime-ready look. This dramatic combination is perfect for those who want to make a bold statement.
Pastel Paradise
Soft pastels blending into one another create a dreamy, whimsical effect. Think lavender into baby blue, or mint green into pale yellow for a spring-inspired look.
Subtle Sparkle
A nude base that gradually transitions to glitter creates an elegant look with just the right amount of glamour. Perfect for special occasions or when you want to add a touch of magic to your manicure.
Find Your Perfect Color Combination
Explore a wide range of acrylic powders and polishes to create your dream ombre nails. Mix and match to discover your signature gradient!
Proper maintenance is key to keeping your ombre acrylic nails looking fresh and beautiful for as long as possible. Here are essential tips for extending the life of your gradient manicure.
Daily Care Tips
Wear gloves when cleaning or using harsh chemicals
Apply cuticle oil daily to keep the area hydrated
Avoid using your nails as tools for opening cans, scratching labels, etc.
Reapply top coat every 2-3 days to maintain shine and prevent chipping
Keep nails dry after showering or swimming by thoroughly drying them
When to Schedule a Fill
Every 2-3 weeks is typical for acrylic nail maintenance
When you notice significant growth at the base of the nail
If any nails lift or separate from your natural nail
When the ombre effect begins to grow out with your natural nail
If you notice any cracks or damage to the acrylic
Longevity Factors
The average lifespan of ombre acrylic nails is 2-3 weeks, but this can vary based on:
Your natural nail growth rate
The quality of products used
How well the application was done
Your daily activities and hand care routine
Whether you follow proper maintenance practices
Essential Products for Ombre Acrylic Nails
Creating and maintaining beautiful ombre acrylic nails requires quality products. Here are our top recommendations for achieving professional-looking results at home.
Acrylic Systems
A complete acrylic system includes liquid monomer and powder polymers. Look for professional-grade products that offer good adhesion and flexibility.
Specialized Brushes
The right brush makes all the difference in creating a seamless gradient. Look for size 8 or 10 acrylic brushes with natural bristles for the best control and blending.
Color Powders
High-quality acrylic powders in various colors are essential for creating stunning ombre effects. Look for finely-milled powders that blend easily.
Prep Products
Proper nail preparation ensures your acrylic application lasts. Invest in quality dehydrators, primers, and nail prep solutions for the best adhesion.
Top Coats
A quality top coat seals your design and adds shine. Choose from glossy, matte, or even specialty finishes like velvet or chrome to customize your look.
Maintenance Kit
Keep your ombre acrylics looking fresh with cuticle oil, nail strengthener, and gentle buffers for touch-ups between salon visits.
Common Mistakes to Avoid with Ombre Acrylic Nails
Even experienced nail enthusiasts can make mistakes when creating ombre acrylic nails. Here are some common pitfalls to avoid for the best results.
What Not to Do
Using too much liquid monomer – This can make the acrylic too runny and difficult to control, resulting in uneven application.
Applying acrylic too thick – Thick application can lead to lifting, bubbling, and an unnatural appearance.
Rushing the blending process – Proper blending takes time and patience; rushing can result in harsh lines instead of a smooth gradient.
Skipping nail prep – Proper dehydration and priming are essential for acrylic adhesion and longevity.
Using poor quality products – Low-quality acrylics can yellow, crack, or fail to blend properly.
Improper filing technique – Aggressive filing can damage your natural nails and create an uneven surface.
Best Practices
Practice color blending on nail tips before applying to your fingers.
Work in a well-ventilated area to avoid inhaling acrylic fumes.
Use the right brush size for your nail width and the detail level needed.
Take your time with each nail to ensure a smooth, even gradient.
Invest in quality products that will blend well and last longer.
Properly prep the natural nail by gently buffing, dehydrating, and priming.
File and shape with gentle, consistent strokes in one direction.
Professional vs. DIY Ombre Acrylic Nails
Deciding between salon services and a DIY approach? Here’s a comprehensive comparison to help you make the best choice for your ombre acrylic nails.
Consideration
Professional Application
DIY Application
Cost
$50-100+ per full set, plus tips
$30-80 for supplies that last multiple applications
Time Investment
1-2 hours at the salon
2-3+ hours, especially for beginners
Quality & Durability
Typically higher quality with 2-3 weeks longevity
Varies based on skill level; may not last as long
Learning Curve
None – rely on expert skills
Steep – requires practice and patience
Design Flexibility
Limited to salon hours and technician availability
Complete freedom to experiment anytime
Health & Safety
Professionals follow sanitation protocols
Requires proper ventilation and careful product handling
If you’re new to acrylic nails, consider starting with a professional application to see how they look and feel. Once you’re familiar with the process, you can decide if investing in DIY supplies makes sense for your lifestyle and budget.
Ready to Try DIY Ombre Acrylics?
Get everything you need to create salon-quality ombre acrylic nails at home. Start your nail art journey today!
Looking for ideas for your next ombre acrylic manicure? Here are some stunning designs to inspire your creativity and help you envision the possibilities.
Classic Baby Boomer French Ombre – The perfect blend of pink to white for an elegant, timeless look suitable for any occasion.
Tropical Sunset Ombre – Vibrant orange blending into pink and purple creates a stunning sunset effect perfect for summer.
Nude to Gold Glitter Ombre – Subtle nude base transitioning to dazzling gold glitter for a touch of glamour.
These inspiring designs showcase the versatility of ombre acrylic nails. Whether you prefer subtle elegance or bold statement looks, the gradient technique offers endless possibilities for expressing your personal style.
Share Your Ombre Nail Creations!
Save these ideas to your Pinterest boards for inspiration and share your own ombre acrylic nail designs with the community!
Ombre acrylic nails offer a stunning way to express your personal style through the artistry of color gradients. Whether you choose to visit a professional nail technician or embark on a DIY adventure, the beautiful blend of colors creates a manicure that’s both eye-catching and sophisticated.
Remember that perfecting the ombre technique takes practice, so don’t be discouraged if your first attempts aren’t flawless. With quality products, proper techniques, and a bit of patience, you’ll soon be creating gorgeous gradient nails that rival salon results.
We hope this guide has inspired you to try ombre acrylic nails and provided the knowledge you need to achieve beautiful results. From classic French ombre to bold sunset gradients, the possibilities are endless—let your creativity flow and enjoy the process of creating your perfect ombre masterpiece!
Start Your Ombre Nail Journey Today
Get all the supplies you need to create stunning ombre acrylic nails at home. Your nail art adventure awaits!