Did you know cold weather can damage your hair just as much as summer heat? The dry air and harsh winds of winter can make your hair brittle and prone to breakage.
This Website contains affiliate links. That means I may earn a small commission if you purchase through my links, at no extra cost to you.
Beautiful braided styles are here to help! They’re not just about looking good. They also protect your hair from winter damage.
This guide will teach you how to do stunning braids. They match perfectly with winter accessories like cozy hats and stylish scarves. These looks will keep you warm and stylish all season.
Get ready to learn easy tutorials that make your winter routine better. You’ll find techniques that are both practical and elegant. This way, you get the best of both worlds.
Key Takeaways
Braids provide essential protection against winter weather damage
These styles work beautifully with winter accessories like hats and scarves
You can achieve both fashion and function with the right techniques
Our tutorials are designed for all skill levels
Proper winter hair care starts with protective styling
These looks are perfect for everyday wear and special occasions
You’ll learn multiple styles to keep your routine fresh all season
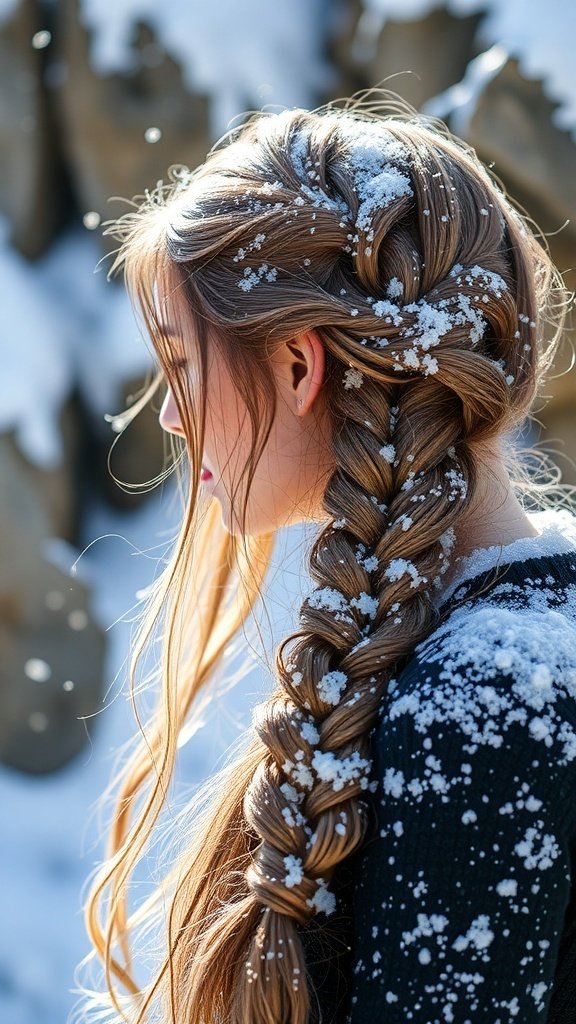
Embracing Braids for the Winter Season
Winter brings hair challenges that braids solve. They protect and style your hair, perfect for cold weather.
Why Braids are a Winter Hair Essential
Braids protect your hair from winter’s harsh elements. They keep your hair organized and safe from damage.
Protecting Hair from Cold and Wind
Cold winds dry out your hair. Braids act as a shield, keeping moisture in. This prevents dryness and damage.
Reducing Static and Breakage in Dry Air
Heating makes air dry, causing static and breakage. Braids reduce friction and static. They also prevent split ends.
Styling Benefits for Winter Fashion
Braids add interest to your winter look. They match well with hats, scarves, and layers.
Complementing Hats, Scarves, and Layers
Braids look great under hats and with scarves. They stay in shape, perfect for indoor and outdoor wear.
Adding Texture and Interest to Outfits
Intricate braids add texture to simple outfits. They make sweaters and coats look elegant. Braids are statement pieces for winter.
Winter Challenge
How Braids Help
Best Braid Styles
Cold wind exposure
Creates protective barrier
French braids, crown braids
Static electricity
Reduces hair friction
Fishtail braids, three-strand braids
Hat hair
Maintains style shape
Dutch braids, boxer braids
Outfit enhancement
Adds texture and interest
Waterfall braids, braided buns
Winter hairstyles like braids are practical and stylish. They turn hair care into a creative activity in winter.
Gathering Your Winter Braiding Toolkit
Before we start with winter braids, let’s get your tools ready. The right tools make a big difference. Winter hair can be dry and static, so you need the right tools.
Essential Tools for Every Braid Style
Good braids need good tools. These basics help you make clean sections and styles that last.
Wide-Tooth Comb, Detangling Brush, and Hair Clips
A wide-tooth comb is great for gentle detangling. It helps prevent breakage on dry winter hair. Then, use a detangling brush for smooth hair.
Hair clips keep sections apart while you work. Choose clips with smooth edges to avoid hair snagging.
Measuring Tension with Hair Elastics and Pins
Choosing the right hair elastics is key. Stay away from metal parts that can damage hair. Silicone-coated elastics are better because they grip without breaking hair.
Bobby pins and spin pins are needed for thicker braids. They keep your braids in place under winter hats.
Top Hair Products for Winter Braiding Success
Winter weather needs special products to fight dryness and static. These products help your braids look neat and stay in place.
Moisturizing Leave-In Conditioners and Creams
Winter air takes moisture from hair. A good leave-in conditioner adds moisture without weighing hair down. Living Proof No Frizz Nourishing Styling Cream is great for fighting static and flyaways.
These products make hair easier to braid. They also protect against dryness all day.
Anti-Frizz Serums, Oils, and Texturizing Sprays
Anti-frizz serums make braiding easier. They tame flyaways from winter static. Lightweight oils like argan or jojoba add shine without being greasy.
Texturizing sprays give hair the right grip for braiding. Ouai Texturizing Hair Spray adds body and keeps braids in shape in humid winter.
With these tools and products, you’re set for winter braids. Your hair will stay beautiful and protected all season.
Prepping Your Hair for Flawless Winter Braids
Getting your hair ready for winter braiding starts with proper preparation. Cold weather can make your hair dry and brittle. Good hair prep winter techniques will give you smooth, manageable hair that holds braids beautifully.
Optimal Washing and Conditioning Routine
A good washing routine is essential for winter hair care. The right products can make all the difference in how your braids turn out.
Selecting Hydrating Shampoos and Conditioners
Choose shampoos and conditioners specifically designed for dry hair. Look for products with moisturizing ingredients like argan oil, shea butter, or hyaluronic acid. Brands like Redken All Soft or Pureology Hydrate Shampoo work well for winter conditions.
These hydrating formulas help combat dryness from indoor heating and cold outdoor air. They leave your hair soft and manageable, perfect for braiding.
Incorporating Deep Conditioning Treatments
Deep conditioning treatments provide extra moisture that regular conditioners can’t match. Use a deep conditioner once a week for best results.
“Weekly deep treatments are essential for maintaining hair health during the dry winter months.”
Apply the treatment from mid-length to ends, leave it on for 5-10 minutes, then rinse thoroughly. This extra step ensures your hair stays healthy and braid-ready all season long.
Detangling and Pre-Styling Techniques
Proper detangling makes winter braiding much easier. It prevents breakage and creates a smooth base for your styles.
Gentle Detangling to Prevent Breakage
Start with a wide-tooth comb or detangling brush. Begin at the ends and work your way up to the roots. This method prevents pulling and reduces breakage.
For extra slip, apply a leave-in conditioner or detangling spray. Take your time with this process – rushing can cause damage to your winter hair.
Applying Pre-Styling Products for Smoothness
The right pre-styling products create the perfect canvas for braiding. They control flyaways and add smoothness without weighing hair down.
Consider these excellent options for winter braiding preparation:
Product Type
Key Benefit
Best For
Anti-frizz serums
Controls static and flyaways
All hair types
Lightweight oils
Adds shine without grease
Dry or damaged hair
Braiding creams
Provides hold and smoothness
Thick or curly hair
Heat protectants
Shields from styling tools
When using hot tools pre-braid
Apply products sparingly – too much can make hair slippery and difficult to braid. Focus on areas that tend to get frizzy or dry.
With these hair prep winter techniques, you’ll create the perfect foundation for any braided style. For more inspiration, check out these 30 stunning winter hair braid ideas that will keep you looking great all season long.
Classic Three-Strand Braid: Simple and Chic
When winter comes, the three-strand braid is key. It looks great under hats and scarves. It’s easy for everyone to do.
Step-by-Step Braiding Instructions
Start with clean, damp hair for the best braid. This braid is the base for many styles.
Dividing Hair into Three Equal Sections
First, gather all your hair. Then, split it into three parts. Make sure each part is the same size. Even parts make a neat braid.
Hold each part with your fingers. Don’t pull too hard. This keeps your braid even and neat.
Crossing Right Over Middle, Left Over Middle
Start by crossing the right part over the middle. Then, cross the left part over the middle. Keep doing this down your hair.
Keep the tension even. Don’t let strands mix. The pattern is right over middle, left over middle, repeat.
“The three-strand braid is like a comfortable winter sweater for your hair—always reliable, never goes out of style, and perfect for any occasion.”
Winter-Specific Tips and Tricks
Cold weather can mess with your braid. Use these tips to keep it looking good all day.
Securing Ends with Snag-Free Hair Ties
Winter makes hair dry and breakable. Use hair ties that don’t snag, like Invisibobble. They’re better than regular bands.
Wrap the hair tie twice for a good hold. This stops breakage. The right hair tie is key in winter.
Preventing Flyaways in Humid Conditions
Static and flyaways happen in cold weather. Rub a bit of anti-frizz serum on your palms. Then, smooth it over your hair.
For more protection, spray your braid with hairspray. This keeps your style in place without being stiff.
Hair Tie Type
Winter Benefits
Best For
Spiral/Coil Ties
No snagging, gentle on dry hair
Fine or damaged hair
Silk-Wrapped Elastics
Reduces static electricity
All hair types
Velvet Scrunchies
Prevents breakage, adds warmth
Thick or long hair
Knotless Elastics
Easy removal without tangles
Daily winter wear
The three-strand braid is very versatile in winter. It’s great for any day or event. With these tips, your braid will stay beautiful all day.
Dutch Braid Tutorial: Voluminous and Bold
Ready to make your winter hairstyle look amazing? The Dutch braid is perfect for the cold months. It makes your hair look raised and adds volume to any outfit.
This braid is different because it stands out. It’s easy to learn and stays great in winter.
Step-by-Step Braiding Instructions
To start a Dutch braid, section your hair right. Use an underhand technique. Follow these steps for a great look.
Starting at the Crown with Three Sections
Start with clean, brushed hair. Take a triangle section at your crown. Make it three inches wide.
Divide this section into three parts. Hold them between your fingers. Make sure each part is the same thickness.
Adding Hair to Each Section as You Braid Under
Now, the magic begins! Instead of crossing strands over, cross them under. Start by crossing the right section under the middle.
Then, cross the left section under the new middle. Before crossing again, add a small piece of hair to the right strand. Keep adding hair and crossing under.
Move down toward your neck. Keep the tension even for a neat braid. Finish with a regular braid to the ends.
Adapting for Winter Weather and Activities
Winter is different for hairstyles. The Dutch braid works well in cold weather with a few tricks.
Weaving in Accessories like Ribbons
Add winter accessories to your braid. Velvet ribbons in holiday colors look great. Tie the ribbon to your first three sections.
Weave the ribbon with your hair as you braid. It adds a beautiful effect. Perfect for holiday parties.
Scarves also add a cozy touch. Pick materials that match your winter clothes.
Keeping Braids Intact Under Winter Hats
Winter hats won’t mess up your braid. Place your braid right before wearing your hat. A centered braid works best.
Choose hats with smooth insides. Wool and cashmere are gentle. After removing your hat, gently comb out any flat spots.
A spritz of texturizing spray can make your braid look fresh. Massage the roots and fix any loose parts. Your braid will stay great all day.
This style is both stylish and practical in winter. With these tips, your Dutch braid will stay beautiful all day, no matter what you do.
French Braid Tutorial: Elegant and Secure
French braids are elegant and keep your hair secure in winter. They make your hair neat and polished. This style is perfect for any event.
Step-by-Step Braiding Instructions
Beginning at the Hairline with Three Sections
Start with clean, detangled hair. Take a small section at your hairline and divide it into three equal parts. Hold them firmly between your fingers.
Begin crossing the right section over the middle, then the left over the new middle. Keep your movements smooth and even for the best results.
As you cross each section, gather additional hair from the side before crossing it over. Continue this pattern down the back of your head.
Maintain consistent tension to prevent loose sections. The braid should lie flat against your scalp for that secure winter hold.
Winter Styling Variations and Ideas
Side French Braids for Scarf-Friendly Looks
Create a side part and braid diagonally across your head. This style keeps hair away from your neck area, making it perfect for scarf wear.
The off-center placement prevents bulk under winter accessories. It’s both practical and fashionable for cold days.
Double French Braids for Extra Warmth and Style
Part your hair down the middle and create two parallel French braids. This style covers more scalp area, providing additional warmth in cold weather.
Double braids distribute hair weight evenly, reducing strain on your scalp. They’re ideal for active winter days and look beautiful under hats.
Fishtail Braid Tutorial: Intricate and Bohemian
Many people feel nervous about trying the fishtail braid. But, it’s easier than it looks. With patience and practice, you can make this stunning bohemian look perfect for winter.
Step-by-Step Braiding Instructions
Follow these simple steps to create your perfect fishtail braid. Remember to take your time and work carefully for the best results.
Dividing Hair into Two Main Sections
Start with brushed, tangle-free hair. Use your fingers to separate all hair into two equal sections. Hold one section in each hand. Make sure both sections feel balanced in thickness.
This division creates the foundation for your fishtail braid. Keep the sections separate but close together as you begin weaving.
Taking Small Strands from Outsides to Cross Over
Take a small strand from the outside of the left section. Cross this strand over to the inside of the right section. Now take a small strand from the outside of the right section.
Cross this strand over to the inside of the left section. Continue alternating sides, always taking small strands from the outside. Keep the tension even as you work down the length of your hair.
This crossing technique creates the distinctive fishtail pattern. The smaller your strands, the more detailed your braid will look.
Making It Winter-Proof and Fashion-Forward
Winter conditions require special considerations for your fishtail braid. Cold weather and dry air can affect how your hairstyle holds up throughout the day.
Using Texturizing Spray for Better Grip
Texturizing spray gives your hair the perfect amount of grip for intricate braiding. Products like Bumble and Bumble Pret-a-Powder work wonderfully. Lightly spray through dry hair before you begin braiding.
This creates texture that helps the fishtail braid hold its shape. The spray adds volume while preventing slipping of those small sections.
Pairing with Cozy Sweaters and Jackets
The fishtail braid complements winter fashion beautifully. This bohemian style looks fantastic with chunky knit sweaters. It also pairs well with shearling jackets and other cold-weather outfits.
The textured braid adds interest to simple winter layers. It creates a balanced look when wearing bulkier clothing items.
Winter Braid Type
Best For
Difficulty Level
Winter Durability
Fishtail Braid
Special occasions, boho style
Intermediate
Excellent with texturizing spray
French Braid
Everyday wear, active days
Beginner
Very good
Dutch Braid
Volume, statement looks
Intermediate
Good
Boxer Braids
Sports, under hats
Beginner
Excellent
With practice, your fishtail braid will become quicker and easier to create. This elegant hairstyle offers a beautiful way to wear your hair all winter long. The unique pattern stands out while keeping hair secure and protected from the elements.
Waterfall Braid Tutorial: Soft and Romantic
Make a dreamy, elegant look with the waterfall braid. It’s great for winter gatherings and special events. This style has cascading strands that frame your face and keep your hair partially secured.
Step-by-Step Braiding Instructions
Follow these simple steps to master the waterfall braid. It looks complicated but is easy to do.
Creating a Cascading Effect by Dropping Sections
Start with a small section of hair at your temple. Divide it into three equal strands. Begin braiding like a regular braid, crossing the right over the middle, then the left over the middle.
After the first crossover, drop the bottom strand. Let it fall freely while keeping tension on the other two. This makes the cascading effect of the waterfall braid.
Picking Up New Sections from the Top
Keep braiding by picking up new hair from the top. Add it to the top strand and cross over the middle.
Drop the bottom strand, pick up new hair, and cross over again. Keep going until you reach the other side. Secure with a clear elastic that matches your hair color.
Winter Adaptations for Indoor and Outdoor Wear
The waterfall braid works well in winter with a few tweaks. These changes keep your style perfect indoors or outdoors.
Integrating with Half-Up Styles for Versatility
Try combining your waterfall braid with a half-up style for winter. After braiding, gather loose hair and the braid’s end into a half ponytail or bun.
This keeps hair away from your face and keeps the romantic look. It’s great for winter activities where you need both style and function.
Minimizing Static in Loose, flowing Parts
Deal with winter static in your braid’s loose parts. Use a small amount of anti-frizz serum or spray on the cascading strands. Focus on areas prone to static.
For the best results, use natural oils like argan or coconut oil. These control static and add shine. Lightly mist anti-static spray for extra protection.
Winter Challenge
Solution
Recommended Products
Static electricity
Anti-frizz serum application
Lightweight hair oils
Hat hair
Half-up integration
Flexible hold hairspray
Dryness from indoor heating
Hydrating leave-in conditioner
Moisturizing hair mists
Wind disruption
Light-hold texturizing spray
Weather-protection products
The waterfall braid is beautiful and practical for winter. It’s perfect for casual wear or elegant events in the cold months.
Boxer Braids Tutorial: Sporty and Durable
Ready to conquer winter sports with style? Boxer braids offer the perfect combination of fashion and function. These braids are great for active winter sports and look chic.
Step-by-Step Braiding Instructions
Creating flawless boxer braids needs symmetry and the right tension. Follow these steps for a look that lasts through winter.
Creating Two Symmetrical Dutch Braids
Start by parting your hair down the middle. Begin braiding on one side, crossing under instead of over. Add hair from both sides as you go.
Do the same on the other side. Mirroring the braiding motion makes it symmetrical. Keep braiding until you reach the ends.
Ensuring Tightness and Evenness Throughout
Keep the tension even as you braid. Pull each section firmly but not too hard. Make sure both braids are tight and smooth.
Use elastic bands that match your hair color to secure the ends. For extra hold, use hairspray.
Ideal for Winter Activities and Layering
Boxer braids excel in winter conditions where other styles might fail. They fit well under hats and helmets and prevent tangles.
Staying Secure During Snow Sports
These braids won’t come loose during skiing, snowboarding, or snowshoeing. The Dutch braid technique makes them flat and comfortable under gear.
No more worrying about hair whipping across your vision during downhill runs. The style stays neatly in place throughout intense activity.
Reducing Hat Hair and Maintaining Shape
Boxer braids combat winter’s biggest hair frustration: hat hair. When you remove your beanie or helmet, simply finger-comb the braids to refresh them.
The structured style maintains its shape better than loose hair. You’ll enjoy presentable hair even after hours under winter headwear.
Crown Braid Tutorial: Regal and Protective
Make your winter hairstyle stand out with the crown braid. It’s elegant and keeps your head warm. This style wraps around your head like a crown, adding beauty and warmth.
Step-by-Step Braiding Instructions
Creating this crown braid takes patience and practice. But it’s so worth it. Follow these steps for a perfect braid.
Braiding Around the Head from Temple to Temple
Start by parting your hair on one side near your temple. Use a Dutch braid, crossing sections under instead of over. This makes your braid look raised and dimensional.
Keep braiding along your hairline, adding small hair sections as you go. Make sure the braid is tight against your scalp for a neat look.
Keep going until you reach the other temple. Keep the tension even for a polished look.
Tucking Ends and Securing with Pins
After braiding your whole head, you’ll have some hair left. Braid this section normally without adding more hair.
Tuck the end of the braid under the start. Use bobby pins to keep it in place. For extra hold, cross pins through the braid.
Pull on the braid edges gently. This makes your braid look softer and fuller.
Winter Benefits and Styling Tips
The crown braid is great for cold weather. It keeps your hair in and looks elegant.
Layering with Ear Muffs for Warmth
This hairstyle goes well with winter accessories. The braid fits neatly, so ear muffs work well without messing up your look.
Choose thin, decorative ear muffs that fit over the braid. This adds warmth and style to your winter look.
Using the Braid to Cover and Protect Ears
The crown braid frames your face and covers your ears. This protects you from cold winds and winter elements.
For better coverage, make the braid wider and closer to your ears. This is perfect for outdoor winter activities.
Winter Occasion
Braiding Variation
Recommended Accessories
Holiday Parties
Looser, softer braid
Sparkly hair pins
Winter Weddings
Tighter, neater braid
Fresh flowers or pearls
Outdoor Activities
Secure, practical braid
Ear muffs or headband
Casual Days
Messier, bohemian braid
Knitted headband
The crown braid is great for any winter event. It’s easy to change from a casual day look to an elegant evening style.
Braided Bun Tutorial: Elegant and Practical
Winter’s chill meets holiday excitement. The braided bun is your perfect styling solution. It’s both beautiful and practical, keeping your hair safe and looking great for any event.
Step-by-Step Braiding Instructions
Start with a foundation braid. Pick your favorite – classic three-strand, Dutch, or French braid.
Braiding a Section and Wrapping into a Bun
Brush your hair to remove tangles. Make your braid along the back of your head, starting from the crown. Leave three inches unbraided at the ends.
Pull the braid gently to loosen it. This adds volume. Then, wrap it into a circular motion to make a neat bun.
Securing with Bobby Pins and Adding Flair
Use criss-cross bobby pins to keep your bun in place. Stick them through the bun and into your scalp hair. For extra hold, use U-shaped pins around the bun’s edge.
Add decorations like:
Pearl-ended pins scattered throughout
Small holiday-themed clips
Delicate ribbon woven through the braid
Sparkly hair jewelry for evening events
Why It’s Perfect for Winter Weather
The braided bun protects your hair in cold months. It keeps your hair beautiful and safe from winter’s challenges.
Shielding Ends from Cold and Moisture
Winter is hard on hair ends. The braided buncompletely encloses your ends, protecting them from:
Winter Element
Hair Damage Risk
Bun Protection Benefit
Cold Air
Dryness and breakage
Complete coverage prevents exposure
Snow and Moisture
Frizz and damage
Hair remains dry and contained
Wind
Tangling and knotting
Hair stays securely in place
Indoor Heating
Dryness and static
Reduced surface area exposed to dry air
Easy Style for Holiday Events and Gatherings
This braided bun is perfect for any event. It looks great all day, from morning to night.
It’s great with winter accessories like scarves and turtlenecks. It keeps hair off your face during meals and stays secure all night. Add seasonal decorations to match your outfit.
At office parties or family gatherings, this braided bun keeps you looking polished. It also protects your hair from winter’s harsh elements.
Braids for Different Hair Types in Winter
Winter braids are beautiful for everyone. But, your hair type is very important. It helps you find the perfect style for cold weather.
Winter’s dry air changes how hair looks. It’s important to care for your hair’s special needs. This way, you can make stunning winter braids.
Tips for Fine or Thin Hair
Fine hair can feel flat in winter. But, you can make braids that look full and stay that way.
Adding Volume with Backcombing or Products
Use Big Sexy Hair Root Pump Plus for volume. Apply it to damp roots before drying. This boosts your hair’s lift.
Tease the crown gently with a fine comb. This adds support without causing tangles. Be careful not to hurt your hair.
“The secret to volume is building from the roots up, not weighing down from the top.”
Choosing Braids that Enhance Fullness
Dutch and French braids add thickness. They’re great for fine hair in winter.
Fishtail braids also add fullness. They make your hair look thicker. Avoid tight braids that flatten your hair.
Tips for Thick or Curly Hair
Thick and curly hair has its own winter challenges. It’s important to work with your hair, not against it.
Managing Bulk with Sectioning and Patience
Divide your hair into sections with clips. This makes braiding easier and more even. Start with smaller sections than you think.
Use a detangling spray before braiding. It reduces frizz and makes braiding smoother. Take your time to avoid uneven braids.
Embracing Natural Texture in Braid Styles
Let your curls show in braids. Braid damp hair instead of straightening it. This adds beautiful texture as it dries.
Boxer and crown braids are great. They celebrate your hair’s natural volume and keep it in check during winter.
Hair Type
Winter Challenge
Best Braid Styles
Key Product
Fine/Thin
Lacking volume
Dutch, French, Fishtail
Volumizing mousse
Thick/Curly
Managing bulk
Boxer, Crown, Waterfall
Detangling spray
All Types
Winter dryness
Protective styles
Leave-in conditioner
Every hair type can rock winter braids. It’s all about finding the right techniques for your hair. Try different things until you find what works best.
Winter doesn’t mean you have to give up style. With these tips, you can make braids that look great and protect your hair.
Incorporating Winter Accessories into Braids
Winter braids get a special touch with the right accessories. They can turn a simple hairstyle into something amazing. They add color, texture, and personality.
This season, try adding fabrics and jewels to your hair. They make your braids pop at any winter event. They also protect your hair from cold damage.
Weaving Ribbons and Scarves for Color
Ribbons and scarves add vibrant color to your braids. They look great with all braid types. They add interest and keep your style festive.
Step-by-Step Guide to Integrating Fabric
Here’s how to weave fabric into your braids:
Choose a ribbon or thin scarf about 1-2 inches wide
Fold the fabric to match your hair section width
Begin braiding as normal, treating the fabric as an extra strand
Keep tension even to prevent slipping or bunching
Secure the end with a small clear elastic
For a casual look, tie a scarf around your ponytail before braiding. This adds a beautiful color base.
Choosing Materials that Complement Outfits
Pick fabrics that match your winter clothes for a coordinated look. Velvet ribbons add luxury to holiday outfits. Plaid patterns are great for casual days.
Here are some winter favorites:
Metallic ribbons for evening events
Cashmere-blend scarves for warmth
Faux fur accents for drama
Seasonal colors like deep red, forest green, or icy blue
Always check if fabrics slip before wearing them out. Some work better than others.
Adding Hair Jewelry and Decorative Clips
Hair jewelry and clips are another way to accessorize winter braids. They decorate and secure your braids. The right pieces can make your braids sparkle all season.
Selecting Festive Pins for Seasonal Themes
Choose pins that show winter’s magic and beauty. Snowflake designs capture the frosty charm. Evergreen branch pins add natural warmth.
Metallic accents in gold or silver are good for many occasions. They shine beautifully in the short winter days. These pieces often start conversations at gatherings.
Using Clips to Secure and Embellish Braids
Decorative clips do double duty in winter braids. They hold sections in place and add interest. Place them where braids meet or where you need extra security.
Try these ideas for the best results:
At the base of a braided bun
Where a French braid begins
Along the length of a waterfall braid
At the ends of boxer braids
Mix different clip styles for a unique look. Just make sure they’re not too heavy for your hair.
The best braid accessories show your personal style. They should make you feel confident and festive all winter.
Maintaining Your Braids in Cold Weather
Winter weather can be tough on your braids. But, with the right care, you can keep them looking great for days. This way, your hair stays safe from the cold.
Daily Care for Long-Lasting Styles
Just a little bit of daily care can keep your braids looking fresh. You don’t need to start over every day.
Refreshing Braids with Light Product Application
Use light products to keep your braids in check. Focus on the parts that need it most. This keeps your hair feeling clean.
Use dry shampoo at the roots to soak up oil. A light hairspray on flyaways works well. A bit of anti-frizz serum on the ends keeps everything neat.
Protecting from Snow, Rain, and Wind Exposure
Winter weather can harm your braids. But, with the right protection, you can avoid frizz and keep your style intact.
Wear a hood or hat outside in the snow or rain. Apply a protective serum before going out. On windy days, wear a scarf to cover your braids.
Nighttime Routine to Preserve Your Braids
How you sleep affects your braids in the morning. Good nighttime care means waking up with beautiful braids.
Sleeping on Silk or Satin Pillowcases
These fabrics are smooth and prevent static. They keep your braids in shape and stop hair breakage. They also keep your hair moist.
Loosely Tying or Covering Braids to Prevent Mess
Secure your braids gently before bed. Use a soft scrunchie or hair tie. Or, wear a satin bonnet or scarf to cover your whole style.
Time of Day
Maintenance Task
Recommended Products
Expected Result
Morning
Refresh roots and flyaways
Dry shampoo, light hairspray
Revived volume and hold
Before Outdoor Exposure
Apply protective products
Anti-frizz serum, protective spray
Weather resistance
Evening
Light moisturizing
Leave-in conditioner spray
Hydration without heaviness
Night
Secure and protect style
Satin pillowcase, loose ties
Preserved braid integrity
Staying consistent with braid maintenance keeps your winter styles looking great. These easy steps help your braids last longer and keep your hair healthy all season.
Common Braiding Mistakes and Winter Solutions
Even experienced braiders face challenges, especially in winter. Cold weather makes hair behave differently. This can make braiding frustrating. But, there are simple solutions to keep your winter hairstyles looking great.
Fixing Uneven Sections and Poor Tension
Uneven sections and poor tension are common braiding mistakes. These issues are more noticeable in winter. But, they can be fixed with practice and the right techniques.
Practicing Consistent Sectioning Techniques
Perfect braids start with consistent sectioning. Detangle hair with a wide-tooth comb. Then, divide hair into clear sections with a rattail comb.
For symmetrical styles, use visual markers. Start by parting your hair down the center. Then, make equal sections on both sides by measuring from your part line to your temple.
Here’s a quick reference table for perfect sectioning:
Braid Type
Recommended Section Size
Measuring Tip
Three-Strand Braid
Three equal sections
Use fingers to measure width
Fishtail Braid
Two main sections
Divide hair exactly in half
Crown Braid
Multiple small sections
Use comb teeth as guide
Waterfall Braid
1-inch sections
Measure against index finger
Adjusting Tightness for Comfort and Hold
Finding the right tension is key in winter braids. Too tight causes headaches. Too loose makes braids fall apart.
Start with medium tension at the crown. Then, loosen it as you go down. This keeps your scalp comfortable and your style intact.
For winter activities, slightly tighter braids work better. Just make sure they’re still comfortable all day.
Addressing Winter-Specific Hair Challenges
Winter weather brings two main hair enemies: static and frizz. Both can ruin your braids. Knowing how to fight them is key.
Combating Static with Anti-Frizz Products
Static makes hair flyaway in winter. Indoor heat and wool hats add to the problem. Anti-frizz products like John Frieda Frizz Ease Serum help a lot.
Apply a pea-sized amount to palms and rub through dry hair before braiding. Focus on mid-lengths to ends where static happens. The serum smooths hair without making it greasy.
For bad static, mist hair with water first. Then apply serum. This combo hydrates and controls flyaways.
Managing Humidity-Induced Frizz and Poofiness
Going from dry indoor heat to moist outdoor air causes hair to expand and contract. This leads to frizz and poofiness that ruins braid definition.
Use leave-in conditioners to fight humidity. Look for products with silicones or natural oils like argan oil. These seal hair cuticles against moisture.
For braids that last all day, style in the environment where you’ll spend most time. If working indoors, braid your hair inside rather than outdoors.
Remember, winter hair needs more moisture. Deep condition weekly to keep hair healthy and improve braiding results.
Step-by-Step Winter Braid Tutorials: Quick Guide
Ready to master winter braiding? This quick guide has all our tutorials ready for you! Whether you’re starting with a three-strand braid or working on a crown braid, this section is your go-to.
Recap of Each Braid Style and Key Steps
Summary of Instructions and Winter Tips
Classic Three-Strand Braid: Great for beginners. Split hair into three parts. Cross right over middle, left over middle. Keep going until you reach the ends. Use anti-static spray to stop flyaways in winter.
Dutch Braid: Adds volume. Start with a small section at the crown. Add hair as you braid out. It’s perfect for keeping hair under hats.
French Braid: Elegant and keeps hair in place. Start at the hairline, adding new hair with each cross. It protects hair from dry winter air.
Fishtail Braid: Adds a bohemian touch. Divide hair into two parts. Cross small pieces from outside to the opposite side. Repeat. Use humidity spray for winter.
Waterfall Braid: Looks romantic. Drop sections while braiding for a cascading look. It’s great for holiday parties.
Boxer Braids: Sporty and strong. Do two Dutch braids from front to nape. It’s perfect for winter sports.
Crown Braid: Keeps hair in place. Braid around the head. It’s great for windy days.
Braided Bun: Elegant and practical. Braid, then wrap into a bun. It’s stylish and keeps warm.
Recommended Tools and Products per Style
All braids: Wide-tooth comb, hair elastics, sectioning clips
Dutch/French braids: Texturizing spray for better grip
Fishtail/Waterfall: Fine mist spray bottle for control
Braided buns: Hair pins, bun formers for volume
Printable Practice Sheet for Easy Learning
Visual Diagrams of Braiding Patterns
Our practice sheets have clear diagrams. They show braid paths and hand positions. You’ll see how each section crosses and where to add new hair.
Each diagram has arrows for direction and numbered steps. Color-coding helps with complex styles like fishtail and waterfall braids.
Checklist of Necessary Items for Each Tutorial
Before braiding, make sure you have:
Clean, detangled hair
Right styling products for your hair
All tools within reach
Good lighting and mirror
Practice patience – braiding gets better with time!
This braid quick guide will help you grow. Bookmark this page for future reference. Happy braiding!
Conclusion
Winter braids are beautiful and keep your hair safe. They look great and protect your hair from cold weather.
There are many braids to choose from. You can pick simple ones or fancy fishtail braids. Each style is perfect for different hair and activities.
Adding ribbons or clips makes braids even more special. They’re great for holiday parties or just hanging out.
Try out different braids to find your favorite. Braids are perfect for any winter event, inside or outside.
This winter braid conclusion encourages you to have fun. Braids are a great choice for the whole season.
FAQ
Why are braids especially great for winter?
Braids keep your hair safe from cold winds and dry air. This stops breakage and static. They also look good with winter hats and scarves, adding style to your outfits.
What products should I use for braiding in winter?
Use moisturizing products like leave-in conditioners and anti-frizz serums. They fight dryness and static. Try Living Proof No Frizz Nourishing Styling Cream and Ouai Texturizing Hair Spray for smooth braids.
How can I prevent flyaways and static in my braids during winter?
Use anti-frizz serums or light hair oils to fight flyaways and static. Apply a texturizing spray for better grip. Sleeping on a silk or satin pillowcase also helps keep your style.
Can I wear braids with winter hats without ruining the style?
Yes! Choose braids like Dutch or boxer braids that fit under hats well. They stay in shape. When you remove your hat, gently fluff your braids and refresh with a light spray or serum.
How do I keep my braids looking fresh throughout the day in cold weather?
Carry a travel-sized anti-frizz serum or texturizing spray for quick fixes. Wear a hood or hat in snow or rain. Use a hydrating mist to fight dryness from indoor heating.
Are there braid styles that work better for fine or thick hair in winter?
Yes! Fine hair looks great in Dutch braids with volumizing products. Thick or curly hair does well with braids that match your texture. Take your time sectioning to manage bulk.
What’s the best way to incorporate winter accessories into braids?
Weave ribbons or lightweight scarves into your braids for color and flair. Add festive clips or pins for a touch of winter style. They secure and embellish your look while matching your winter clothes.